![Full Color.png]](https://learn.tryswivl.com/hs-fs/hubfs/Full%20Color.png?height=50&name=Full%20Color.png)
Step 1: Access Site Setup in SiteLink
-
Log into SiteLink Corporate Control Center
-
Navigate to Site Setup in the main menu.
-
Click on “Permission API Users and Rights”.
Step 2: Create a New API User for swivl
-
Click “Add New” to create a new API user.
-
Create a unique User Name and Password. For example:
- User Name: swivl
- Password: Storage2025!
- Email address: info@tryswivl.com
ℹ️ This username and password must match what you enter later in your swivl Integration settings.
Step 3: Grant All Permissions
-
Check all the boxes at the top of the permissions window. This ensures swivl has the necessary access to manage tenant interactions, retrieve account details, and send automated communications.
Step 4: Add swivl Credentials in Your swivl Integration Page
-
Log in to your swivl account.
-
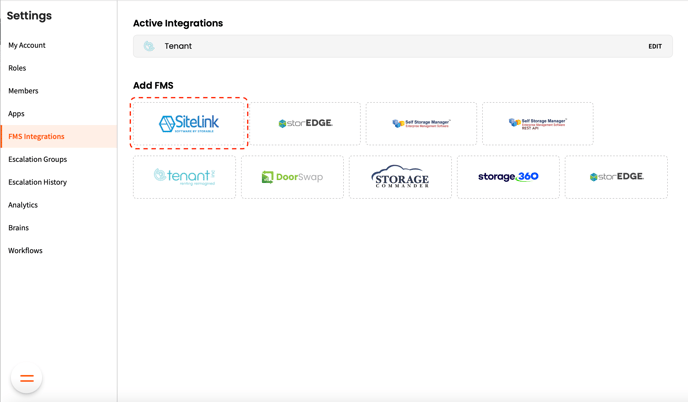
Go to the Settings > FMS Integrations section.
- +ADD SITELINK > A new row will be added beneath Active Integrations. Select EDIT on the far right.
-
Enter the following information:
-
Your Corporate Logon Code (provided by SiteLink for your account)
-
Enter the User Name and Password you created for swivl's user in SiteLink.
-


Note: “Lead Unit ID” is rarely used. If you’re unsure about this, leave it blank
Add your Location Codes to swivl
To obtain your Location Code (also referred to as your FMS ID), please navigate to your SiteLink login screen. You will find a field labeled Location Code, which identifies your store uniquely.
Once you have your Location Code, proceed to add it to the swivl platform by following these steps:
- Access the Property Manager.
- Select the desired Location from the left-hand side menu.
- Click on Location Features located under the Details tab.
- Select Edit in the top right corner and enter the Location Code in the FMS ID field.