![Full Color.png]](https://learn.tryswivl.com/hs-fs/hubfs/Full%20Color.png?height=50&name=Full%20Color.png)
Connecting QuikStor as Your FMS
Step 1: Configure API Permissions
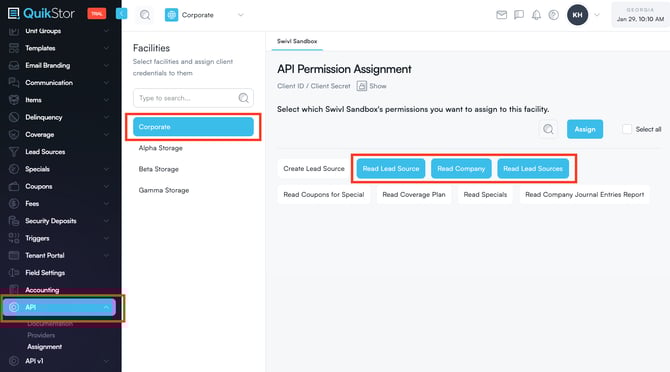
Before swivl can communicate with QuikStor, you'll need to grant the appropriate API permissions. Permissions are assigned at two levels: Corporate and Facility.
Corporate-Level Permissions
Assign the following permissions at the Corporate level:
- Read Lead Source
- Read Lead Sources
- Read Company
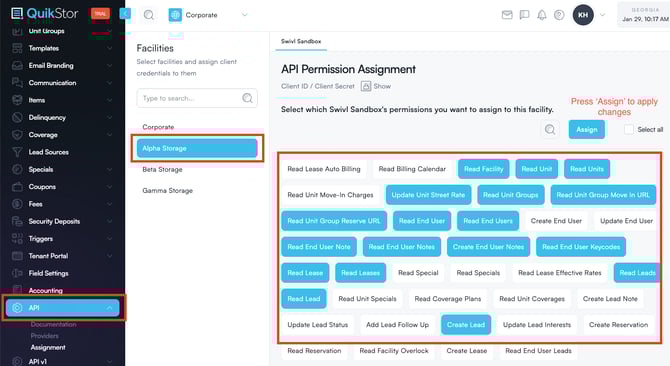
Facility-Level Permissions
Assign the following permissions for each facility that will integrate with swivl:
- Read Facility
- Read Unit
- Read Units
- Read Unit Group Move In URL
- Read Unit Group Reserve URL
- Read End User
- Read End Users
- Read End User Note
- Read End User Notes
- Create End User Notes
- Read End User Keycodes
- Read Lease
- Read Leases
- Read Lead
- Read Leads
- Create Lead
|
💡 Tip: If you manage multiple facilities, make sure to assign the facility-level permissions for each individual facility that you want connected to swivl — not just one. |
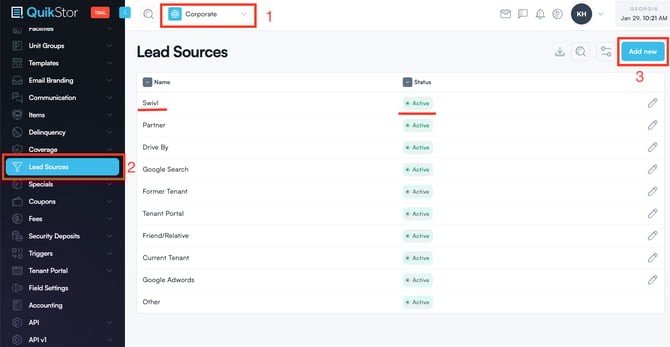
Step 2: Create a Lead Source
Swivl uses a dedicated lead source in QuikStor to track inquiries that come through your chatbot. You'll need to create this manually before completing the integration.
- In your QuikStor dashboard, navigate to the Lead Sources settings.
- Create a new lead source and name it exactly: swivl.
- Make sure the swivl lead source is set to Active.
|
⚠️ Important: The lead source name must be Swivl (with an uppercase S) exactly as written. Any variation may prevent leads from being attributed correctly. |
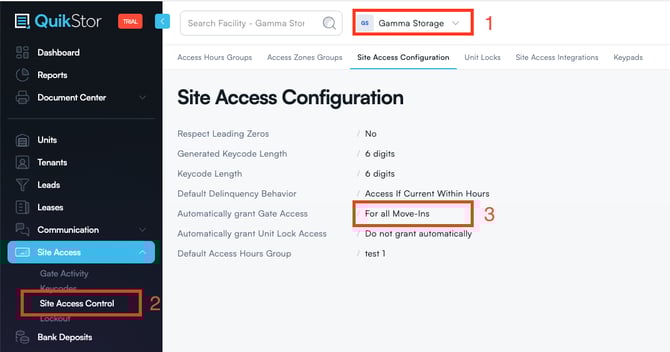
Step 3: Set Up Automated Access Code Generation
This step configures QuikStor to automatically assign access codes (keycodes) to new tenants when they sign a lease. By default, access codes are not generated automatically, so you'll need to enable this for each applicable facility.
When enabled, QuikStor will automatically assign a keycode to a new tenant when all of the following are true:
- A new lease is created for a unit in a zone that requires a keycode for access.
- The tenant does not yet have a keycode (meaning they are a brand-new tenant with no prior leases).
|
💡 Tip: Not all facilities need this enabled. If your facility uses access cards, physical keys, or another access technology instead of keycodes, tenants without keycodes may be expected and this step may not apply to you. |
Configuring Access Hours and Access Zones
A keycode requires both access hours and access zones to be specified before it can be created. You can set these up directly in your QuikStor dashboard:
- Go to Site Access in your QuikStor dashboard.
- Select Site Access Control.
- Configure your Access Hours Groups under the Access Hours Groups tab.
- Configure your Access Zones Groups under the Access Zones Groups tab.
|
📬 Need help?: Have questions during your QuikStor setup? Reach out to us at support@tryswivl.com and we'll help you get connected. |